
Choosing PCD Surface Prep Grinding Heads is more than matching a tool to a grinder. The right head can remove stubborn coatings, adhesives, and surface buildup at a controlled pace. Yet performance also depends on the material beneath the coating. Thick epoxy on hard concrete behaves differently from thin paint on a softer slab. Small details matter. Before starting, check grinder compatibility, working width, segment arrangement, rotation direction, and the manufacturer’s speed guidance. Dust extraction and a stable machine setup also affect visibility, surface finish, and tool wear. A sound choice begins with the actual floor, not a product photo.
These seven tips focus on practical factors that can narrow the options: coating type, concrete hardness, removal rate, machine weight, and the finish required for the next flooring stage. There is no universal winner. A head suited to aggressive coating removal may leave a surface that needs additional preparation. Testing a small area can reveal unexpected chatter, uneven wear, or slower-than-expected progress before the full job begins. That extra check may feel unnecessary when a deadline is close. It is often worth doing. Product specifications are useful, but they cannot describe every slab, coating, or machine setup. Compare them with the job conditions, and ask the supplier or manufacturer when compatibility is unclear. A careful selection will not guarantee a perfect result, but it can reduce avoidable delays and help produce a more consistent prepared surface.
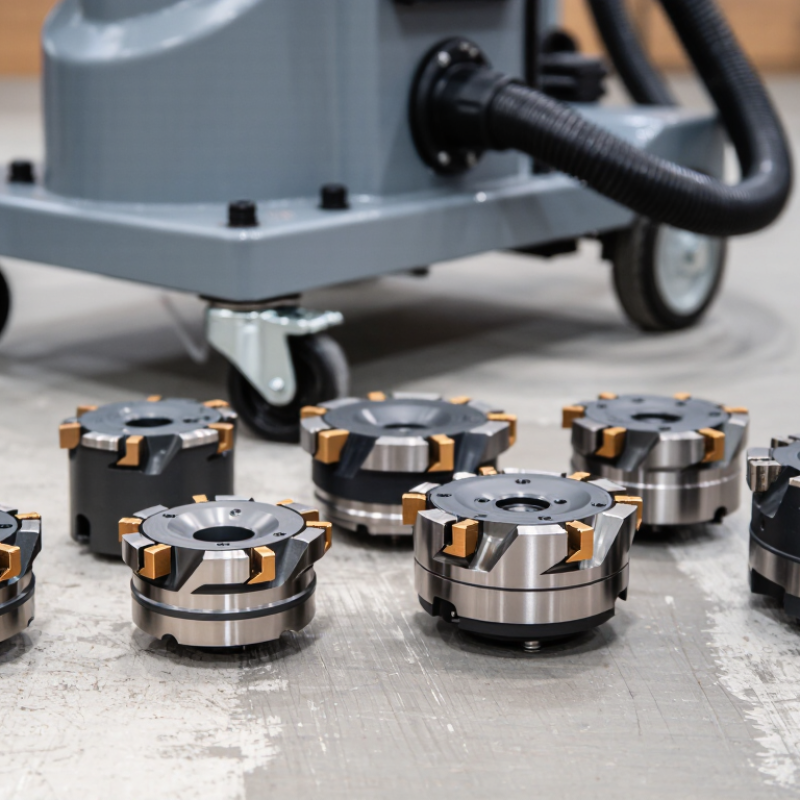
PCD surface prep grinding heads remove coatings through hard cutting edges, not the fine abrasion used by ordinary diamond grinding heads. Their polycrystalline diamond segments are bonded to a carbide base and scrape across the floor as the machine rotates. On an epoxy-coated slab, the edges can break the coating into flakes or strips, exposing concrete underneath. They are commonly used on tough layers such as adhesive, paint, and thick sealers. They are not designed to leave a polished finish.
The head’s movement, segment layout, and machine pressure affect how it cuts. Too much pressure can make the machine harder to control and may gouge soft or uneven concrete. Too little pressure can leave coating behind. Check any rotation markings, since some segment designs are directional, and clear dust regularly so removed material does not interfere with the cut. Start with a small test area. Watch how the coating breaks and inspect the concrete beneath it. A patch that looks clean may still carry residue. That part is easy to miss. A PCD head can remove material quickly, but the right choice depends on coating thickness, floor condition, and the finish required afterward.
Tip: Identify the coating before choosing a PCD grinding head. Look for its type, thickness, and bond to the floor. Thick epoxy, hard adhesive, and stubborn mastic may need aggressive removal. Thin paint or soft coatings can smear or load the tool instead. A quick visual guess can be wrong. Check a small test area and inspect the debris; flakes, powder, and sticky residue offer useful clues.
Tip: Read the surface beneath the coating. Concrete hardness, cracks, exposed aggregate, and previous repairs all affect head choice. A worn, uneven slab may need a less aggressive approach to avoid gouging high spots. If the coating hides the substrate, expose a small patch before committing. I have seen a “simple” coating job change once the concrete appeared. That is worth planning for.
Tip: Match the head to the removal goal, not just the coating name. For full removal, prioritize cutting action and monitor the floor profile. For partial removal, use controlled passes and check whether a thin residue remains. Watch for vibration, uneven wear, or rapid loading; these can signal a mismatch. Slow down. Conditions vary across one floor, so reassess as each section opens up.
The ICRI CSP scale runs from 1 (smoothest) to 10 (roughest) and describes concrete surface texture. It is an ordinal profile scale, not a measurement of coating thickness or removal rate. Identify the coating type and condition separately: PCD heads are commonly used to remove thick or resilient coatings, while exposed concrete and the required final profile should guide how aggressively you grind.
Match the PCD head to what must come off, not simply to the machine’s power. Broad, angled segments can bite into thick coatings and adhesive, while smaller or fewer segments concentrate pressure on stubborn residue. For thin films or final cleanup, an aggressive head may gouge the slab and leave extra repair work. Test a small patch.
ICRI 310.2R-2013 describes ten concrete surface profile grades, CSP 1 through CSP 10. Use its profile guidance to define the finish your next layer requires; “clean” alone is not a useful target. A pointed PCD design may remove localized buildup, while a wider layout can cover open floor areas more evenly. Dust, coating thickness, and slab hardness all affect the result.
Watch the first pass closely. If the head chatters, skips, or leaves deep tracks, change the segment layout or reduce pressure before continuing. A slower pass can be cheaper than patching scars. Not always. The right choice depends on the actual coating, and mixed layers can behave unpredictably. Keep a small test area and compare its texture with the specified profile before scaling up.
Before fitting a PCD surface-preparation head, match its connection to the grinder’s spindle, arbor, or threaded mount. A head that appears to fit may still seat poorly. Check its diameter, rotation direction, guard clearance, and maximum rated speed against the grinder manual and tool markings. ANSI B7.1-2017 provides guidance on safe abrasive-wheel use, including matching operating speed to the wheel’s rated limit; do not assume every PCD head follows identical specifications. RPM matters. A mismatch can cause vibration, uneven cutting, or tool damage.
Check the grinder’s operating requirements under load, not just its nameplate. Confirm that its power supply, spindle capacity, dust extraction, and guard arrangement suit the head and the concrete surface. OSHA’s 2023 workplace injury report recorded 2.6 million nonfatal injuries and illnesses in private industry; this broad figure is not specific to grinding, but it underscores why equipment checks should not be skipped. Start with the machine unplugged, inspect the mounting face for grit or damage, then secure the head as directed. A brief test on a small area can reveal chatter or poor tracking. This check can feel fussy. It is still worth doing, especially when a head’s rating or fit is unclear; stop and verify rather than forcing the setup.
When comparing PCD surface prep grinding heads, look beyond the purchase price. Their diamond segments can remove thick coatings and stubborn adhesive quickly, but service life depends on the floor, machine pressure, and operator technique. On a concrete slab with soft patches, an aggressive head may wear unevenly or expose areas you meant to preserve. Test a small section first. It takes minutes.
Estimate cost per usable square foot, not cost per head. A durable option may reduce changeovers, yet a slower cutting rate can erase that saving. Record the area covered, coating type, and time spent on each job. These notes make comparisons more reliable than a supplier’s expected lifespan alone. Results still vary.
Safety belongs in the comparison too. Check that the head fits the grinder and is securely installed before starting. Use the machine guard and suitable dust extraction; fine concrete dust can travel well beyond the work area. Wear eye, hearing, and respiratory protection appropriate to the equipment and site. Stop if the head vibrates, chips, or leaves an unexpected groove. A longer life is not always a win if the tool is too aggressive for the surface.
Match the segment layout to the material. Broad, angled segments can remove thick coatings and adhesive. Test a small patch first.
It may gouge the slab and leave repair work. Use a less aggressive setup, then check the surface texture.
Use the required concrete surface profile, not just the word “clean.” CSP grades range from 1 to 10. Compare a test area with the target.
Confirm the mount, diameter, rotation direction, guard clearance, and rated speed. Check the grinder manual. A head that seems to fit may still seat poorly.
The head’s rated limit must suit the grinder’s operating speed. A mismatch can cause vibration, uneven cutting, or equipment damage. RPM matters.
Unplug the machine and check the mounting face for grit or damage. Secure the head as directed. Run a brief test on a small area.
Track the usable area, coating type, and time spent. Compare cost per square foot, not only the price per head. Results still vary.
Use the guard, suitable dust extraction, and appropriate eye, hearing, and respiratory protection. Fine dust can travel beyond the work area. Stop if the head vibrates or leaves unexpected grooves.
Stop and check the segment layout and pressure before continuing. A slower pass may prevent surface scars. I still find this easy to overlook.
Choosing the right PCD Surface Prep Grinding Heads starts with understanding how their cutting elements remove coatings and surface layers. Before selecting a head, assess the material to be removed, its thickness, and the condition of the underlying surface. These details help determine whether the task calls for aggressive removal or a more controlled approach that limits surface damage.
Next, match the head’s design to the job and confirm that it is compatible with your grinder’s specifications and operating requirements. Consider durability, expected service life, and overall cost alongside safe handling and operation. A careful comparison of these factors can help you select a head that performs effectively, suits the equipment, and supports consistent surface preparation.